
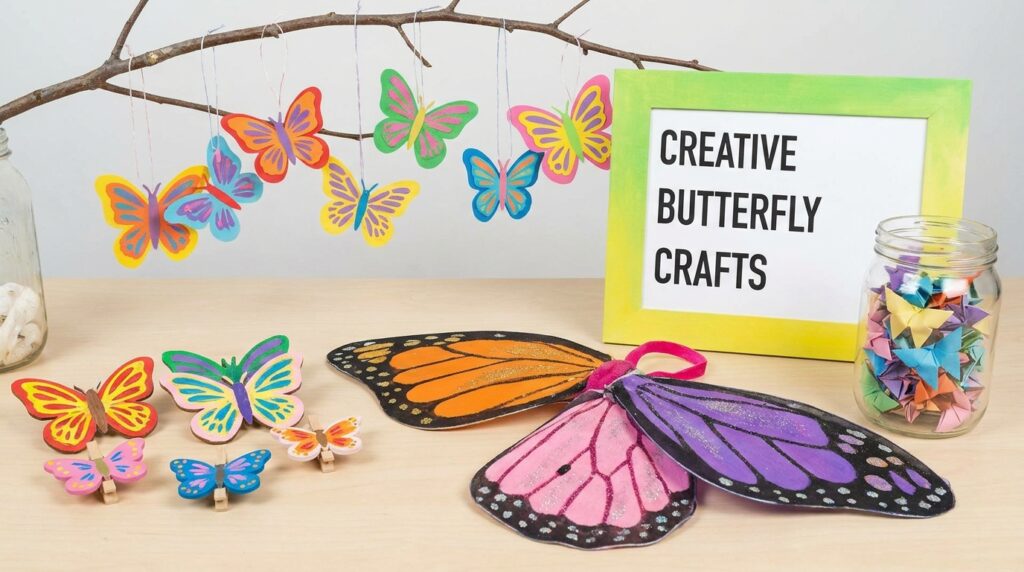
Butterflies are colorful, delicate, and easy to turn into fun craft inspiration for children. With simple supplies such as paper, paint, cardboard, pipe cleaners, and craft sticks, kids can create their own colorful butterflies while exploring different shapes, patterns, and textures. These projects can be adapted for various ages and skill levels, making them useful for classroom activities, nature-themed lessons, or creative afternoons at home.
From simple paper butterflies to playful decorations, there are plenty of ways to make each project unique. If you’re looking for an engaging activity for little crafters, these butterfly craft ideas for kids offer plenty of colorful inspiration to try together.
1. Create Colorful Tie-Dye Coffee Filter Butterflies
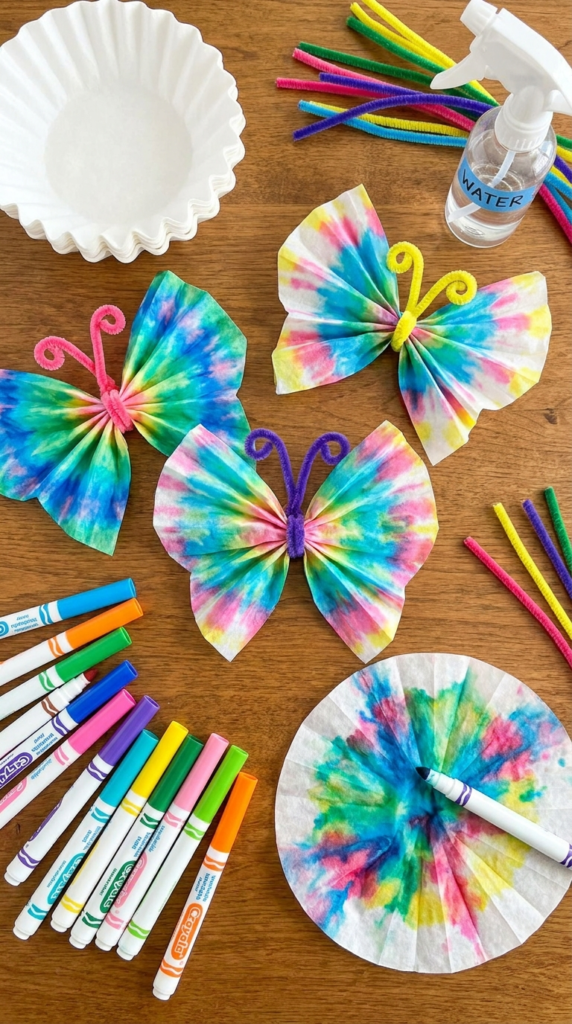
Coffee filters make excellent lightweight wings for a simple butterfly art project. Their thin, absorbent material allows washable markers and water to blend into soft patterns.
Start by placing a coffee filter on a protected work surface. Let children draw lines, dots, and patches of color across the filter using washable markers. Avoid covering every part with a heavy layer of ink because the colors need room to spread.
Lightly mist the filter with water and watch the colors blend together. Allow the paper to dry completely before gathering the center.
Pinch the middle section and secure it with a pipe cleaner, chenille stem, or a small piece of craft wire. Shape the remaining ends into antennae.
Children can experiment with different color combinations to create unique butterflies. Once finished, attach the butterflies to cardstock, string several together for a mobile, or display them near a window.
2. Make Tissue Paper Butterflies From Paper Plates
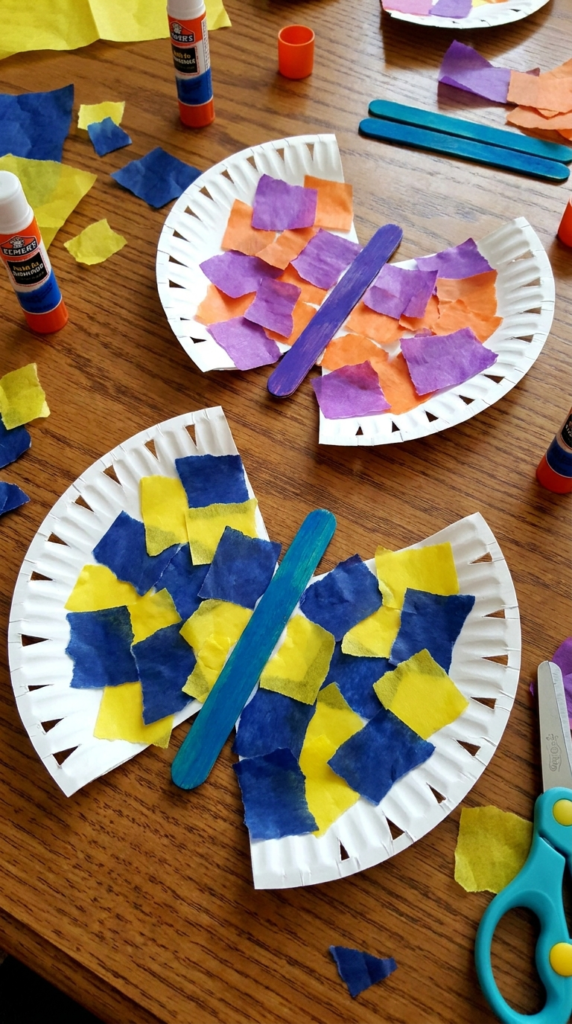
A paper plate can provide a sturdy base for colorful butterfly wings. Cut the plate in half and make small decorative cuts along the curved edge to create a more wing-like silhouette.
Open the two halves outward and decorate them with torn tissue paper. Children can choose several colors and overlap the pieces to create patterns across the wings.
For a simple body, paint a wooden craft stick and attach it vertically between the two wings. Googly eyes, paper antennae, or small pieces of pipe cleaner can complete the butterfly.
You can encourage children to experiment with contrasting colors. For example, placing darker tissue paper beneath brighter colors can make individual sections stand out.
This project is easy to prepare for a classroom because paper plates, tissue paper, and glue are inexpensive and widely available.
3. Turn Wooden Clothespins Into Butterfly Bodies
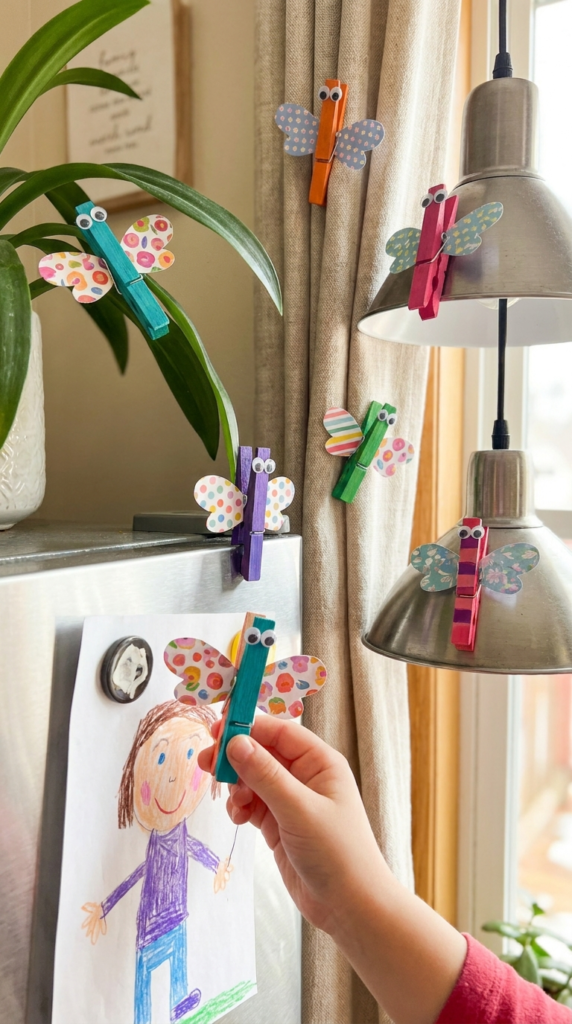
Wooden clothespins provide a convenient body for a small butterfly craft. Paint the clothespin with washable or craft-safe paint and let it dry before adding decorative details.
Cut wings from cardstock, construction paper, felt, or lightweight patterned paper. Attach the wings to the back of the clothespin with craft glue.
Add small paper eyes or googly eyes to the front and use short pieces of pipe cleaner for antennae. Children can decorate the wings with dots, stripes, hearts, or other patterns.
Because the clothespin opens and closes, finished butterflies can be clipped onto suitable surfaces such as a bulletin board, a piece of string, or a decorative display.
Avoid attaching them to delicate lampshades or electrical fixtures, and supervise younger children when using small decorative components.
4. Explore Symmetry With Folded Paint Butterflies
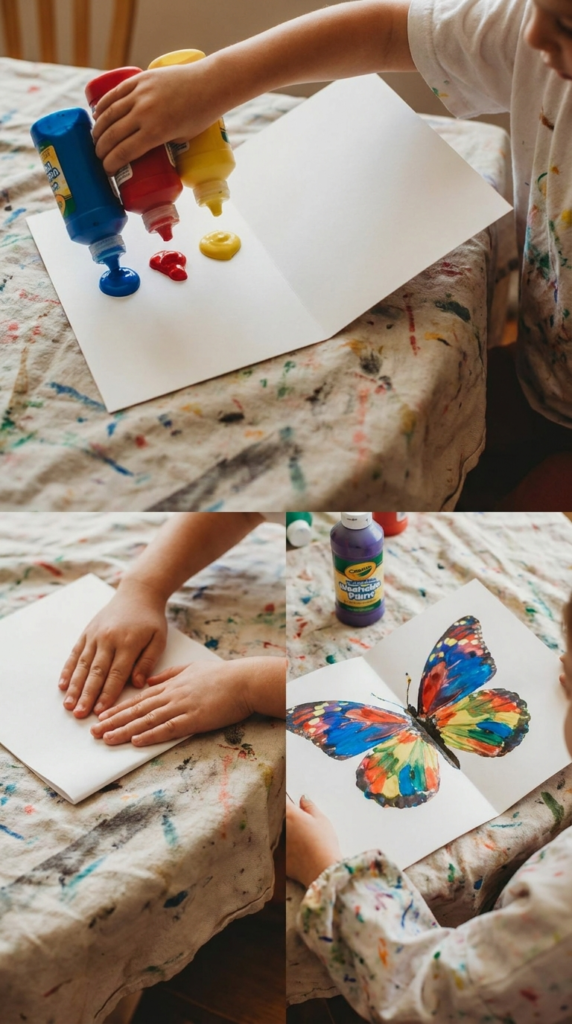
A paint-folding activity gives children an easy introduction to symmetry while creating colorful butterfly artwork. Begin by folding a piece of sturdy paper or cardstock in half.
Open the paper and place small amounts of washable paint on one side near the center fold. Use several colors to create a more detailed pattern, but avoid adding so much paint that the paper becomes saturated.
Fold the paper closed again and gently press across the surface. Carefully open it to reveal a mirrored pattern on both sides.
Once the paint has dried, draw or cut around the design to emphasize the butterfly shape. Add a body down the center with a marker or a narrow piece of paper.
This activity provides both an art project and a simple visual demonstration of how symmetrical patterns can be created.
5. Transform an Egg Carton Caterpillar Into a Butterfly
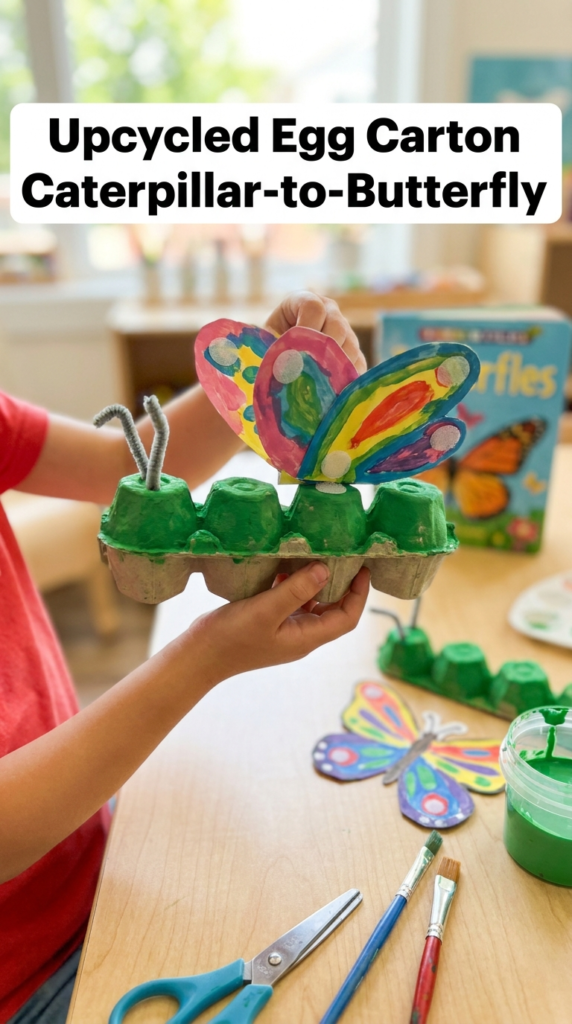
Turn a cardboard egg carton into a craft that represents the transformation from caterpillar to butterfly. Cut a short row of cups from a clean, dry carton and trim away any rough edges.
Paint the connected cups green or another color and let the paint dry. Add eyes and simple facial details to create the caterpillar.
For the butterfly stage, prepare a pair of cardstock wings separately. Instead of permanently attaching them, use child-friendly reusable fasteners so children can add or remove the wings during pretend play.
This gives the project a storytelling element. Children can move from the caterpillar stage to the butterfly stage while learning about the basic idea of metamorphosis.
Adults should handle the cutting of the egg carton for younger children, especially when using regular scissors.
6. Build Butterfly Sculptures From Cardboard Rolls
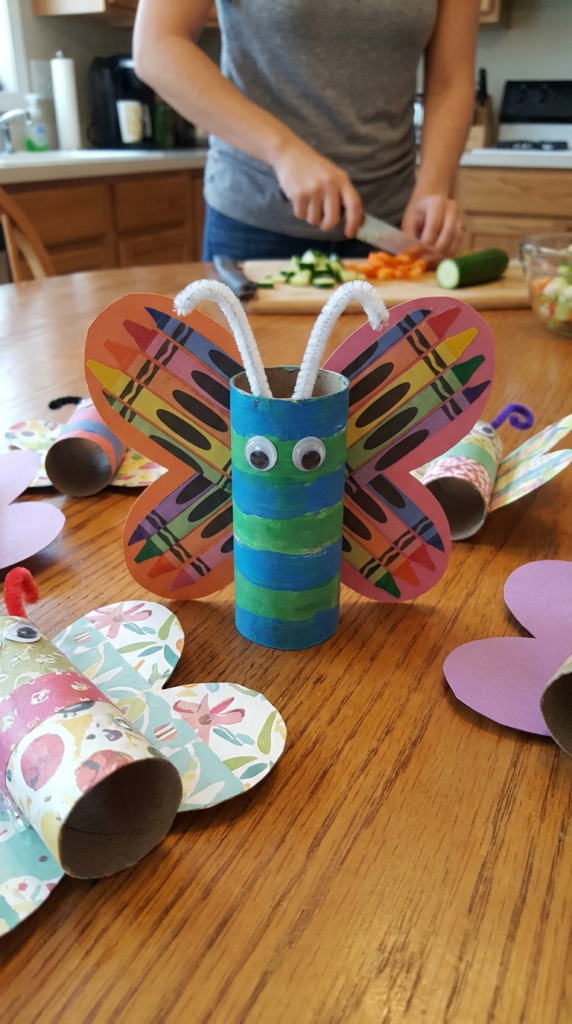
Empty cardboard toilet paper rolls can become the bodies of colorful butterflies. First, cover the tube with construction paper or paint it using washable tempera paint.
While the body dries, cut two pairs of wings from cardstock. You can make the wings symmetrical by folding a piece of paper in half, drawing one wing shape, cutting it out, and then opening the paper.
Decorate the wings with markers, crayons, paint, tissue paper, or small paper shapes. Attach them to opposite sides of the cardboard tube.
Finish the butterfly with paper antennae and eyes. Several completed butterflies can be arranged together on a large sheet of cardboard to create a garden scene.
This is also a useful way to reuse clean cardboard rolls that would otherwise be thrown away.
7. Make a Botanical Butterfly Suncatcher With Flowers
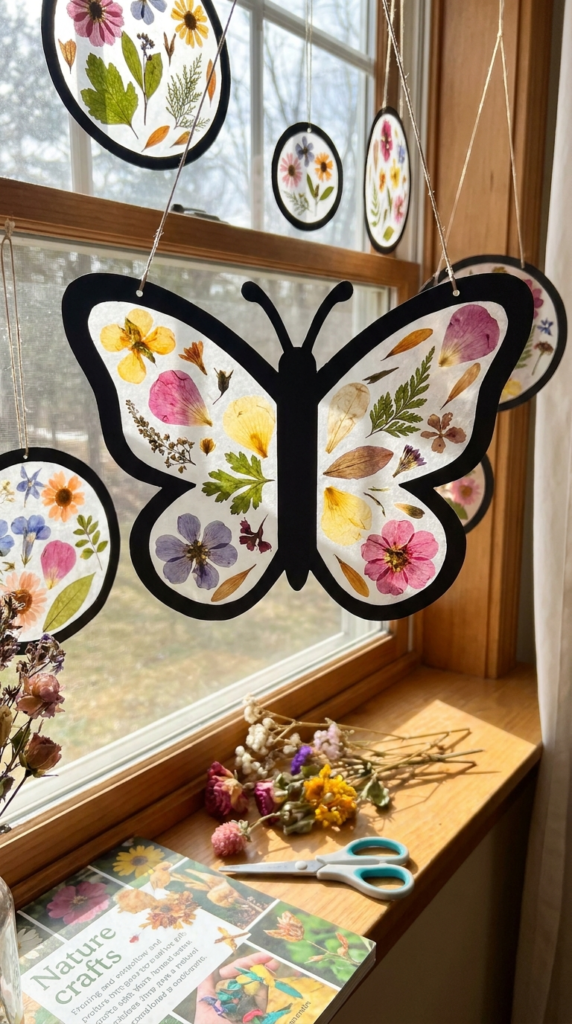
Small fallen petals and leaves can become part of a nature-inspired butterfly display. Collect only fallen plant material from places where gathering is permitted rather than picking live flowers or leaves.
Flatten the materials beforehand if necessary. Arrange the petals and leaves between sheets of translucent craft material or another suitable suncatcher surface.
Create a butterfly outline from dark cardstock and place it around the botanical arrangement to emphasize the wing shape. Attach the finished piece to a window where natural light can pass through it.
Different leaves and petals will produce different colors, textures, and silhouettes. Children can arrange the materials symmetrically or create two completely different wings.
If using wax paper or a heat-based method to seal the craft, an adult should handle the heated equipment and follow appropriate safety precautions.
8. Create a Butterfly Collage With Bow-Tie Pasta
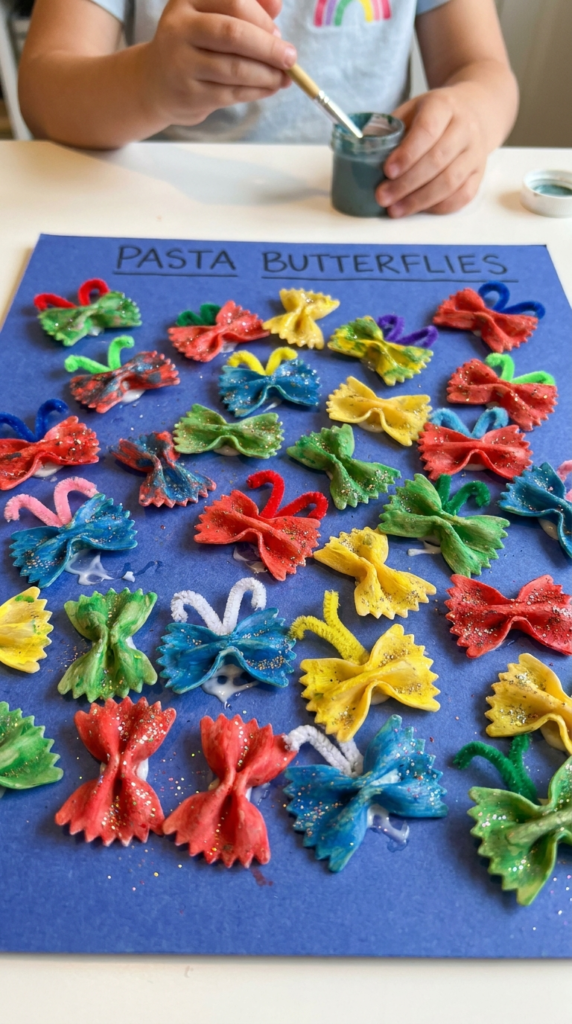
Bow-tie pasta has a natural shape that can resemble butterfly wings, making it useful for a simple collage. Use dry, uncooked pasta and decorate it with washable paint.
Once the pasta is completely dry, arrange the pieces on cardstock or poster board. A single piece can represent one butterfly, or several can be combined into a larger garden scene.
Paint the pasta in different colors and add paper bodies underneath each piece. Small drawn antennae can complete the design.
For younger children, provide a limited selection of colors so they can focus on arranging the shapes rather than becoming overwhelmed by too many materials.
Because dry pasta is small, supervise young children closely and keep it away from children who may put craft materials in their mouths.
9. Make Handprint Butterfly Keepsakes
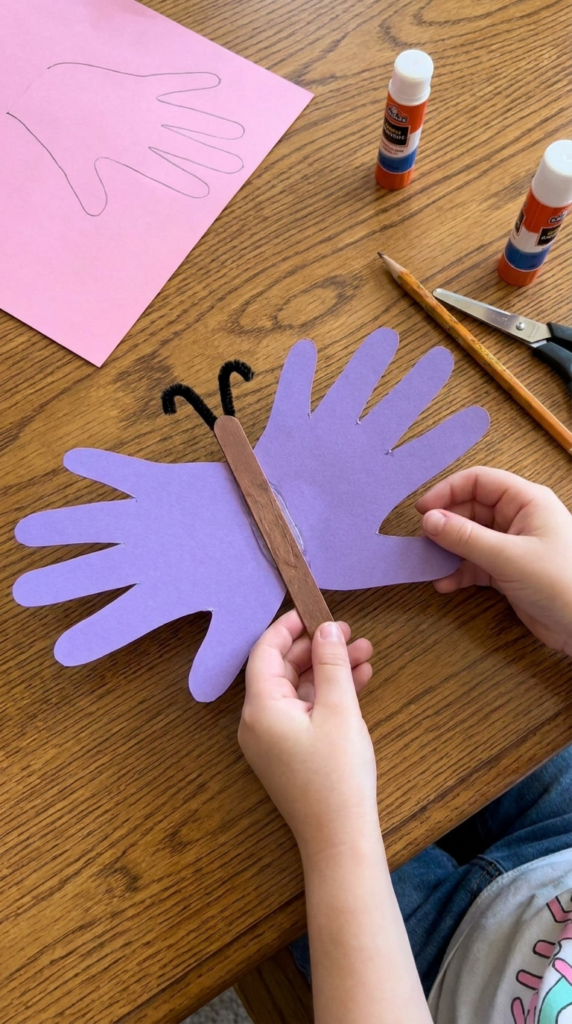
Handprint crafts can turn a child’s artwork into a personalized butterfly keepsake. Trace both hands onto colored cardstock and carefully cut out the shapes.
Arrange the handprints so the fingers point outward and the wrist sections meet in the center. These become the butterfly’s wings.
Add a narrow paper strip, craft stick, or another suitable material over the center to create the body. Draw eyes and attach paper or pipe-cleaner antennae to complete the design.
You can add the child’s name and the date to the back so the craft becomes a simple record of how small their hands were at the time.
This project can be used for family gifts, classroom displays, or seasonal decorations. If children are old enough to use scissors, choose age-appropriate scissors and supervise cutting.
10. Make Ruffled Butterfly Wings From Cupcake Liners
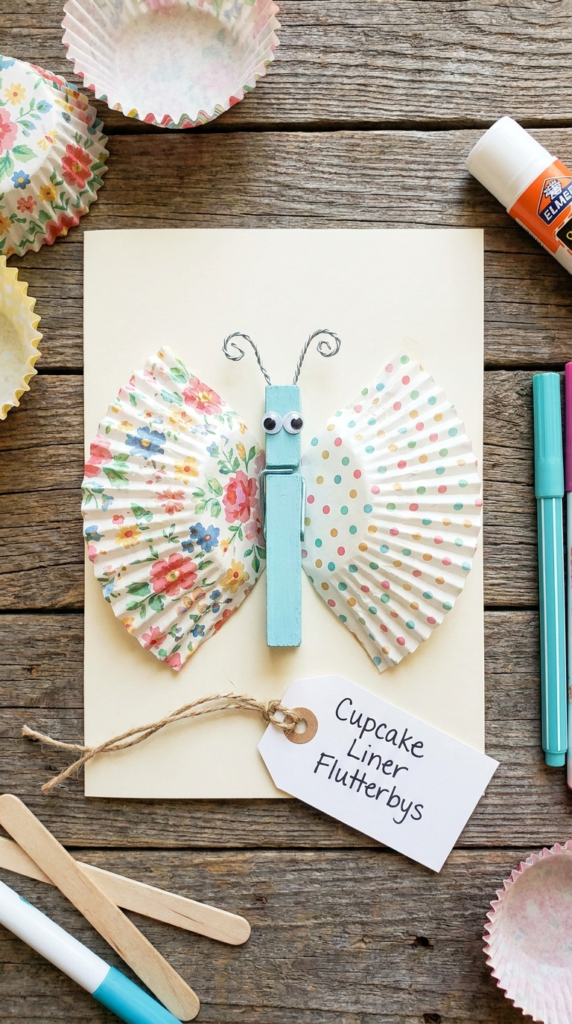
Decorative cupcake liners already have a pleated shape that works well as butterfly wings. Choose two liners with colors or patterns that complement each other.
Flatten the liners gently and fold each one slightly to create a more defined wing shape. Arrange them on a sheet of cardstock with the inner edges close together.
Place a craft stick, paper strip, or painted clothespin down the center to form the body. Add eyes and antennae for a finishing touch.
This is a quick craft that can be adapted for parties, classrooms, or rainy-day activities. Children can also decorate plain cupcake liners with washable markers before assembling their butterflies.
For a larger display, make butterflies in several sizes and arrange them across a wall or bulletin board.
11. Make Beaded Pipe Cleaner Butterflies
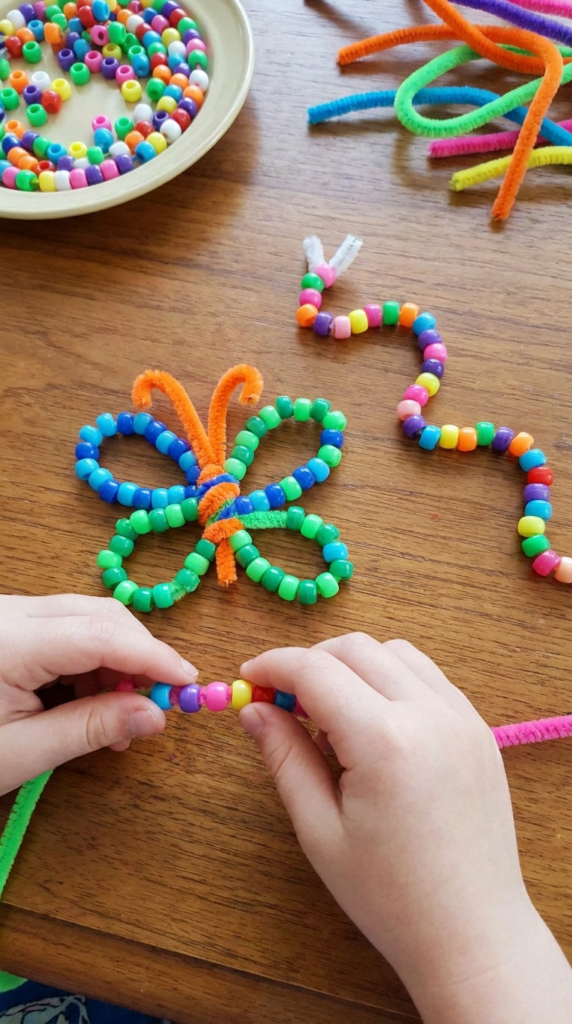
Plastic pony beads and pipe cleaners can be combined to make colorful three-dimensional butterflies. Start by threading beads onto pipe cleaners while leaving enough space at the ends for shaping.
Create loops from the beaded sections to form the wings. Twist the center carefully so the loops remain together.
A separate pipe cleaner can be wrapped around the middle to form the body, with the remaining ends shaped into antennae.
This craft provides practice with threading, bending, twisting, and arranging small components. Children can experiment with repeating bead patterns or use random colors for a more playful result.
Because beads are small, this activity is best for children who are developmentally ready to work with small craft pieces and should be supervised when necessary.
12. Create a Butterfly Footprint Salt Dough Keepsake
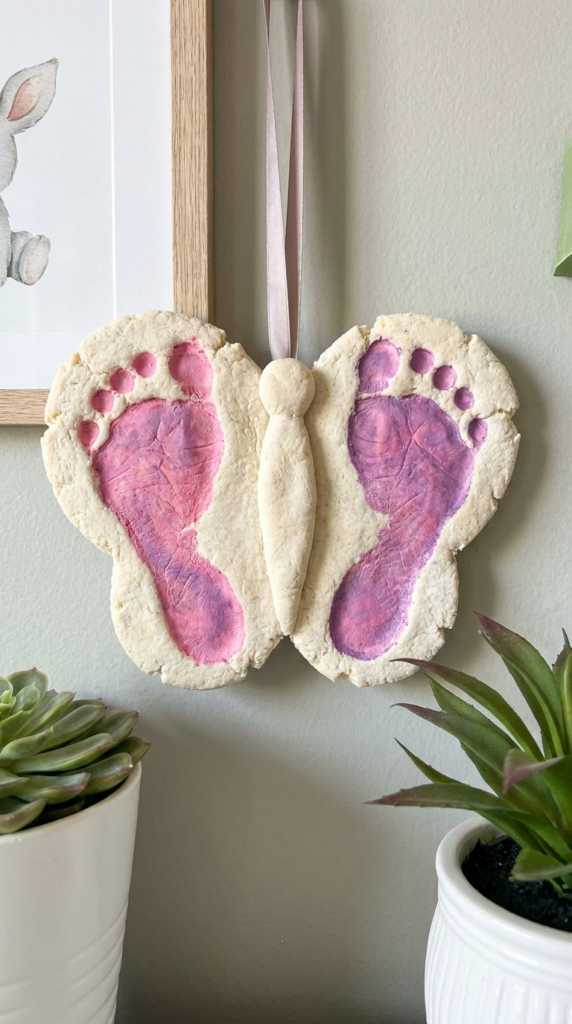
Salt dough can preserve a child’s footprint in a decorative craft. Mix a basic dough using flour, salt, and water until it reaches a workable consistency.
Roll the dough to an even thickness and place it on a suitable baking surface. Position two feet at outward angles so the footprints resemble butterfly wings.
Press gently and remove the feet carefully to preserve the impressions. An adult should handle the baking or drying process according to the chosen salt-dough recipe.
After the piece has cooled completely, paint the footprint areas and add a body between them. You can include the child’s name and date as part of the decoration.
This project is particularly suitable as a keepsake, but remember that homemade salt dough decorations are not toys and should be kept away from pets and children who may try to eat them.
13. Fold Colorful Origami Butterflies
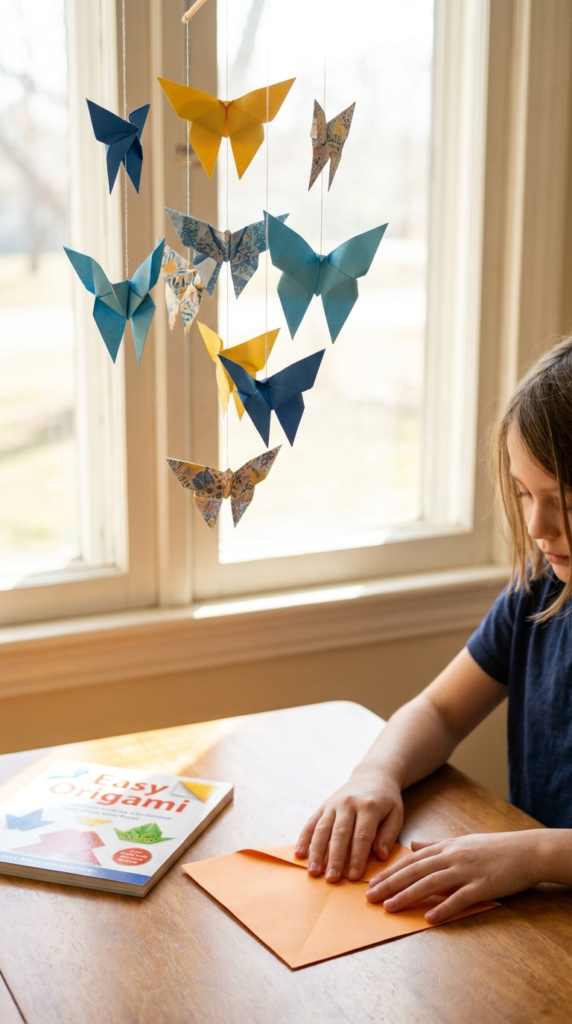
Origami butterflies give older children an opportunity to practice careful paper folding. Use square sheets of lightweight origami paper or cut regular craft paper into squares.
Follow a simple butterfly-folding pattern and encourage children to crease each fold carefully. The process requires patience because small differences in the folds can change the final shape.
Once several butterflies have been completed, string them together to create a hanging decoration. They can also be attached individually to cards, gift packages, notebooks, or classroom displays.
Using papers with different colors on each side can make the finished folds more visually interesting.
For beginners, start with larger squares because larger paper is generally easier to manipulate than very small sheets.
14. Design Butterflies From Fallen Leaves
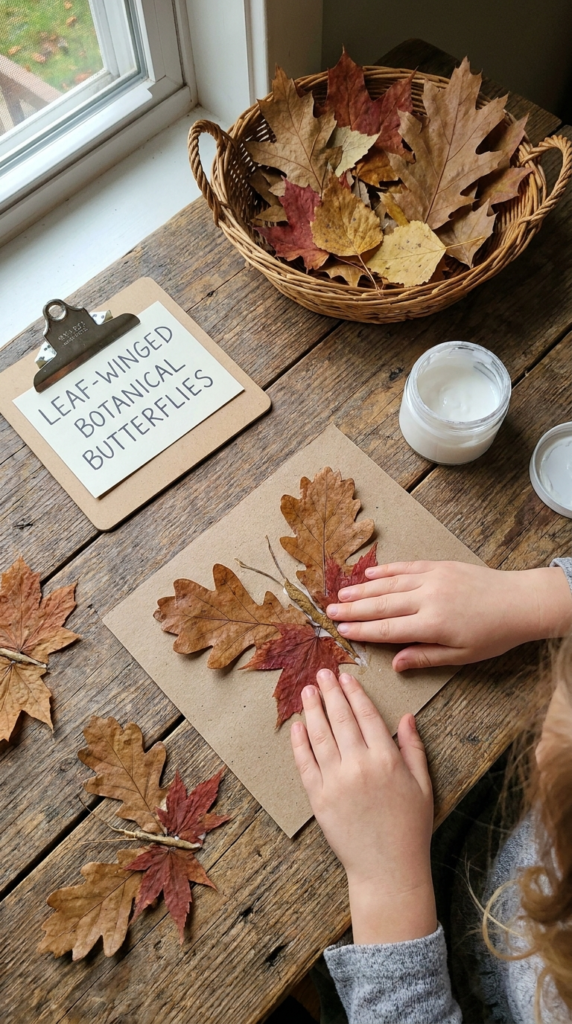
Fallen leaves can become natural butterfly wings with a little imagination. Collect clean, dry leaves in different shapes and sizes from the ground.
Look for pairs that are similar in shape so each side of the butterfly can appear balanced. Arrange two leaves on a sheet of paper with their narrower ends pointing toward the center.
Add a small twig, strip of paper, or drawn line between the wings to represent the butterfly’s body. Tiny leaves or pieces of grass can be used for antennae.
Secure the arrangement with craft glue and allow it to dry flat. Once finished, frame the botanical butterfly or include several in a larger nature collage.
Leaves change color and texture as they dry, so the final artwork may develop additional character over time.
15. Make a Butterfly Mosaic From Foam and Paper Scraps
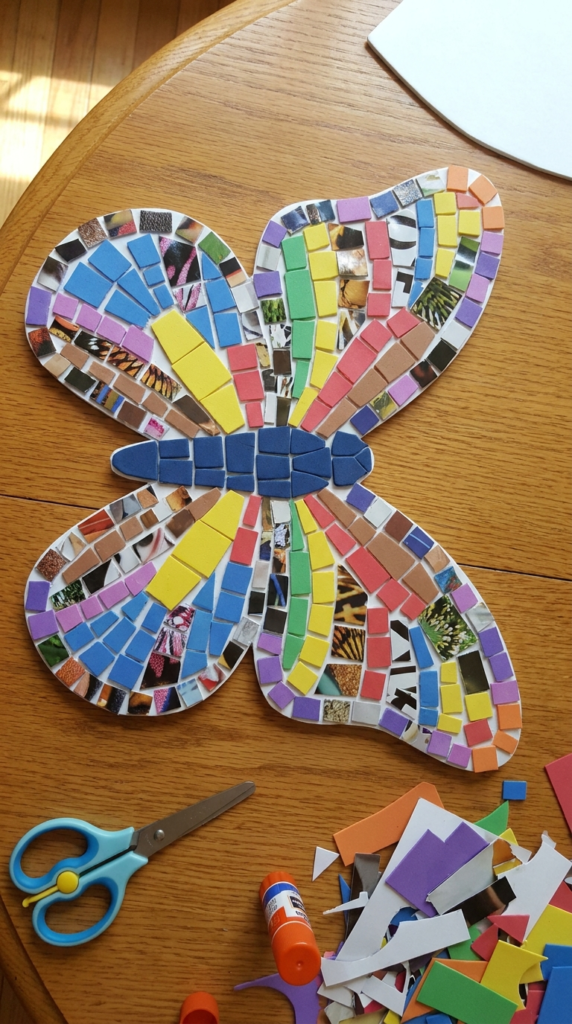
Create a colorful mosaic by first cutting a large butterfly silhouette from sturdy cardboard or foam board. Draw the wing sections lightly with a pencil to establish areas for different colors.
Provide small pieces of construction paper, craft foam, magazine pages, or other suitable lightweight materials. Children can sort the pieces by color before gluing them inside the butterfly outline.
Leave narrow spaces between some sections to create the appearance of separate mosaic tiles. You can use matching colors for a symmetrical butterfly or deliberately create contrasting wings.
Allow the adhesive to dry completely before moving the artwork.
This craft encourages children to practice color recognition, sorting, spatial arrangement, and controlled gluing while creating a decorative piece that can be displayed on a wall or bulletin board.
16. Print Textured Butterfly Wings With Bubble Wrap
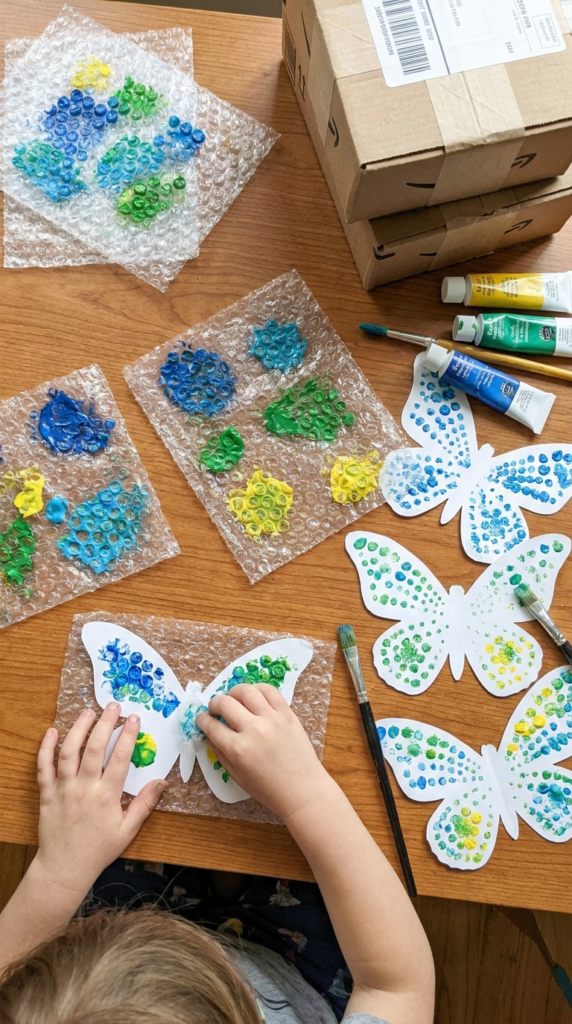
Bubble wrap provides a simple way to create dotted patterns that resemble the textured appearance of butterfly wings. Save a clean piece of bubble wrap from packaging and cut it into a manageable size.
Place the bubble side upward and apply a thin layer of washable paint with a brush or sponge. Avoid adding too much paint because heavy coverage can blur the individual bubble patterns.
Press the painted bubble wrap gently onto paper and lift it straight up. The bubbles should leave a repeating dotted texture behind.
Once the print dries, cut the paper into butterfly wings or stamp the pattern directly onto a butterfly outline. Add a paper body and antennae to complete the craft.
Try using two or three colors on separate sections of the wings to create layered patterns. This technique can also be repeated across a large sheet of paper to create a colorful butterfly garden.