
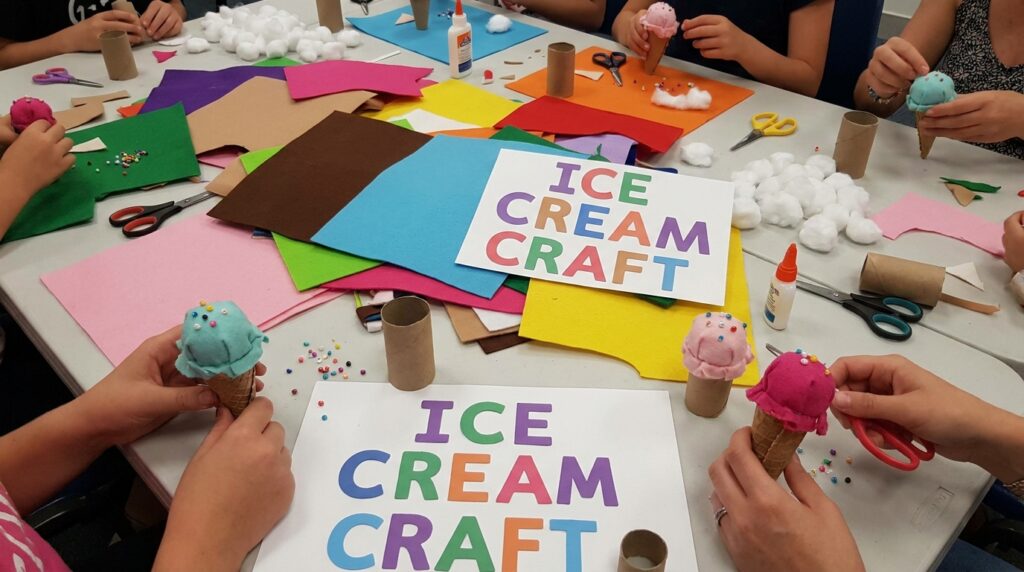
Ice cream is a favorite treat for many kids, and it can also inspire some wonderfully colorful craft projects. With simple supplies such as paper, cardboard, paint, pom-poms, and craft sticks, children can create playful ice cream cones, popsicles, sundaes, and other sweet-looking decorations.
These activities are a fun way to encourage creativity while letting kids experiment with colors, shapes, and textures. Whether you’re planning a summer activity, a classroom project, or a rainy-day craft session at home, there are plenty of ideas to explore. Get your supplies ready and discover these fun ice cream crafts that kids can enjoy making and personalizing.
1. Make Fluffy Ice Cream Cones With Tissue Paper
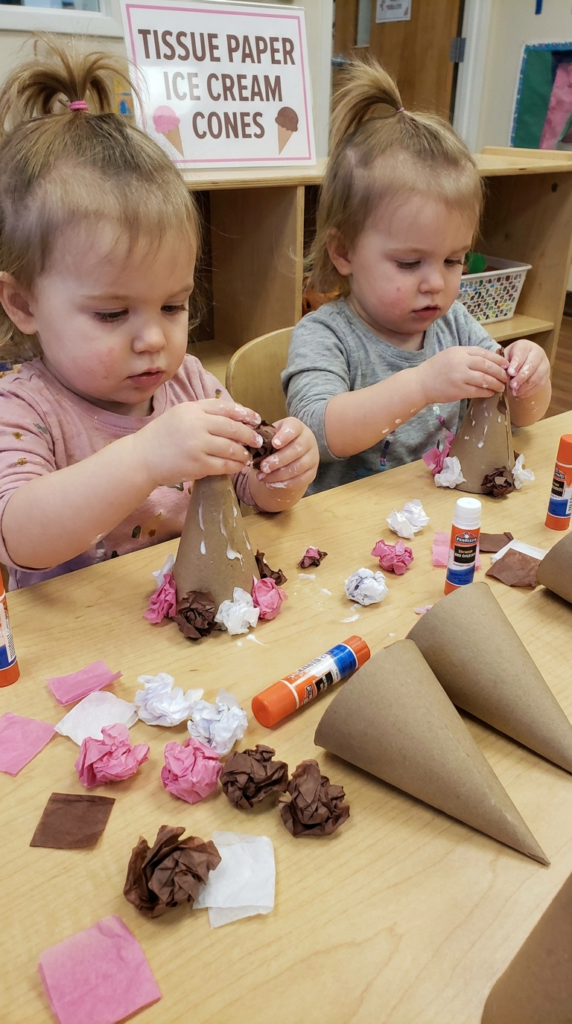
Turn ordinary tissue paper and cardstock into colorful ice cream artwork with plenty of texture. Start by cutting a simple cone shape from brown cardstock or construction paper. Then choose several tissue paper colors to represent different ice cream flavors.
Have children tear or cut the tissue paper into small squares and gently crumple each piece into a small ball. Glue the pieces closely together inside the scoop outline until the entire area looks full and fluffy. Pink can represent strawberry, white can become vanilla, and light brown can stand in for chocolate.
This craft is particularly suitable for younger children because crumpling paper and placing small pieces onto a larger shape provides an easy hands-on activity. Adults can prepare the cone and scoop outlines ahead of time to make the project easier for a classroom or playgroup.
2. Create Colorful Ice Cream Bars With Popsicle Sticks
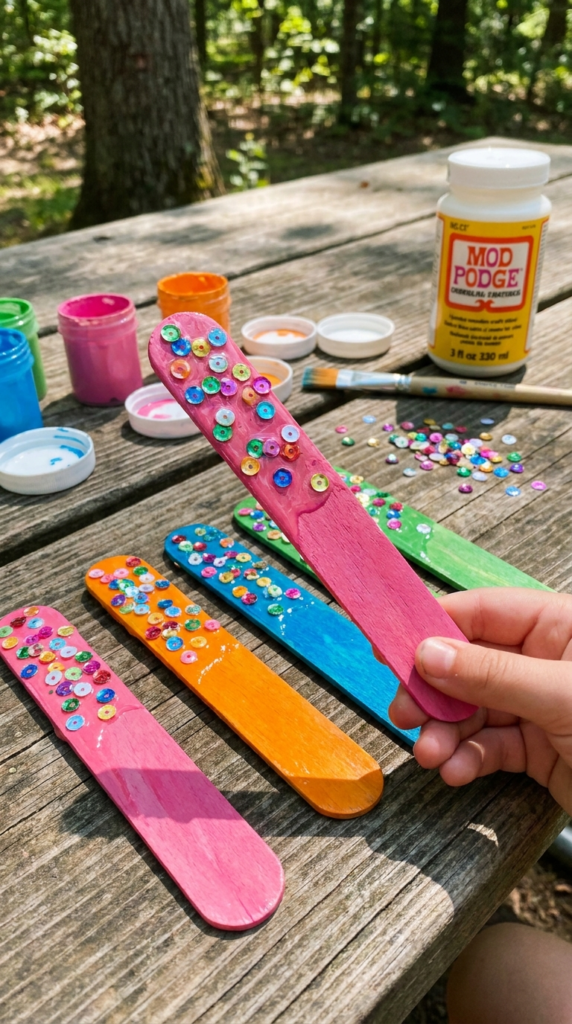
Jumbo craft sticks can become the base for simple ice cream bar decorations. Paint each stick in a different color, such as pink, mint green, yellow, blue, or chocolate brown, depending on the flavors you want to represent.
Once the paint has dried completely, children can decorate the bars with paper sprinkles, small foam shapes, sequins, or painted dots. A layer of craft sealer can be added by an adult if you want the finished pieces to have a more polished appearance.
For a larger project, arrange several decorated bars together on a sheet of cardstock to create an ice cream shop display. Children can also write or draw their own flavor combinations beside each one if the activity is being used for an older age group.
3. Build Miniature Sundaes With Yarn Pompoms
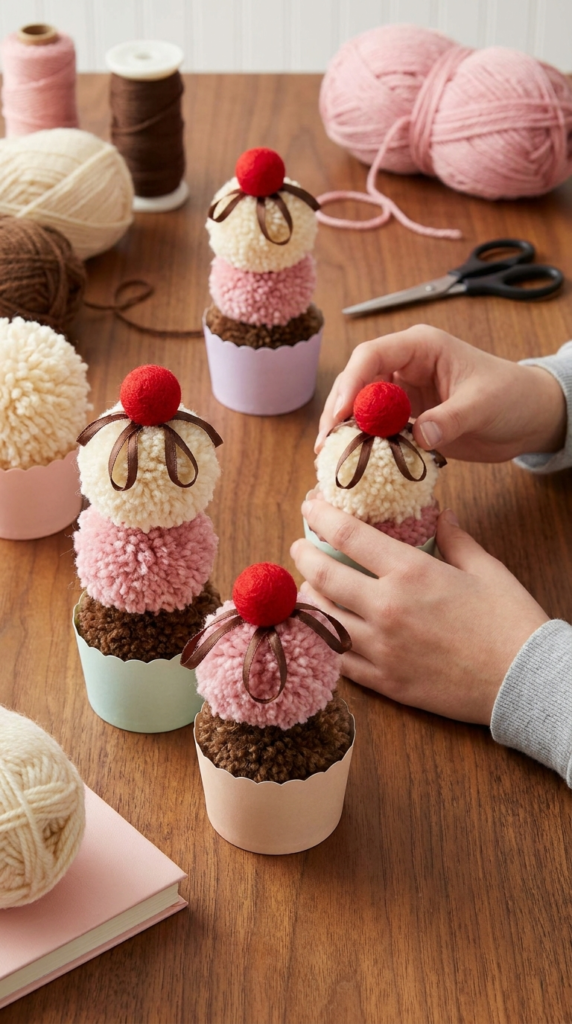
Create playful pretend sundaes using paper cups, large yarn pompoms, and a few simple decorative materials. Choose pompoms in different colors and stack them inside a small paper cup to resemble scoops of ice cream.
A red pompom can serve as the cherry on top, while thin pieces of brown ribbon or yarn can represent chocolate syrup. Small paper circles can be used as sprinkles without introducing loose edible ingredients into the craft area.
These miniature sundaes can become decorations for a pretend restaurant, play kitchen, or desk. Older children can experiment with different combinations of colors and toppings to create their own imaginary menu.
4. Turn Egg Cartons Into Textured Ice Cream Scoops
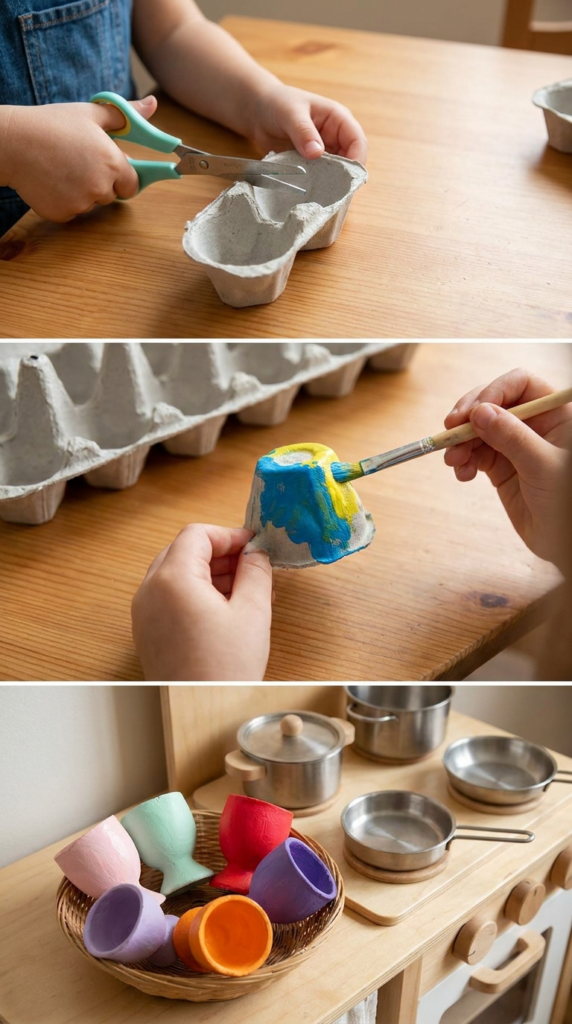
Instead of throwing away a clean cardboard egg carton, transform its individual cups into unusual ice cream scoops. Carefully cut the cups apart and trim any uneven edges before giving them to children.
Turn the cups upside down and paint them in pastel shades such as peach, lavender, pale pink, cream, or light blue. After the paint dries, attach each scoop to a cone made from construction paper or lightweight cardboard.
The molded surface of the egg carton naturally gives the project some texture. The finished pieces can be displayed as wall art or incorporated into pretend-play activities. Because cutting cardboard can require sharp scissors, an adult should prepare the egg-carton pieces for younger children.
5. Sew or Assemble a Felt Ice Cream Play Set
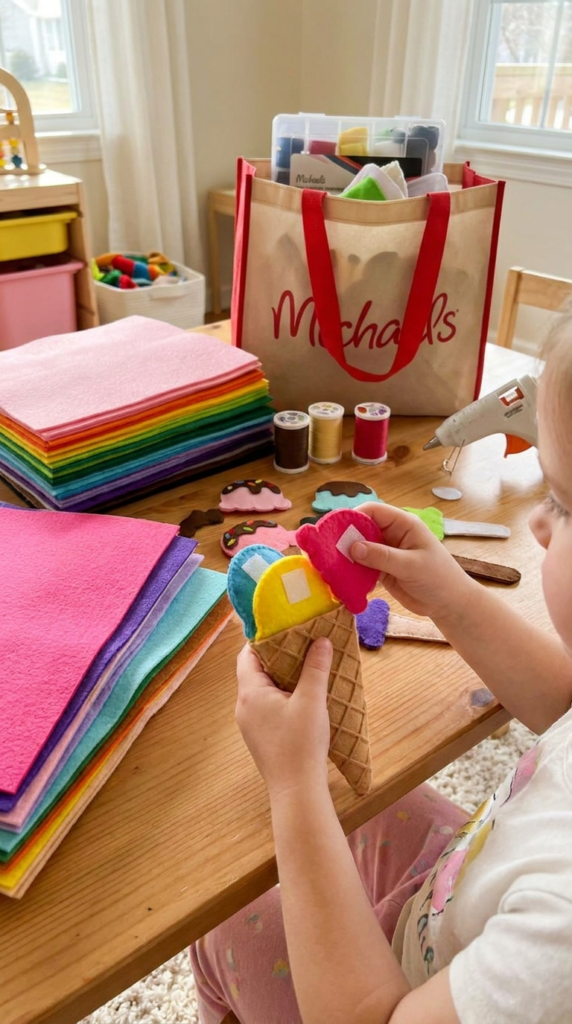
Felt is a useful material for creating reusable pretend ice cream pieces. Cut out cone shapes, rounded scoops, cherries, sprinkles, and other toppings from different colors of felt.
Older children and adults can sew the pieces together for extra durability, while simpler versions can be assembled with fabric-safe adhesive under adult supervision. Make several scoops in different colors so children can mix and match their pretend flavors.
A felt set can be used repeatedly for pretend-shop games. Children can practice choosing combinations, arranging toppings, serving imaginary customers, and organizing their play food afterward. It also provides a creative alternative to disposable paper crafts.
6. Build an Ice Cream Truck From a Large Cardboard Box
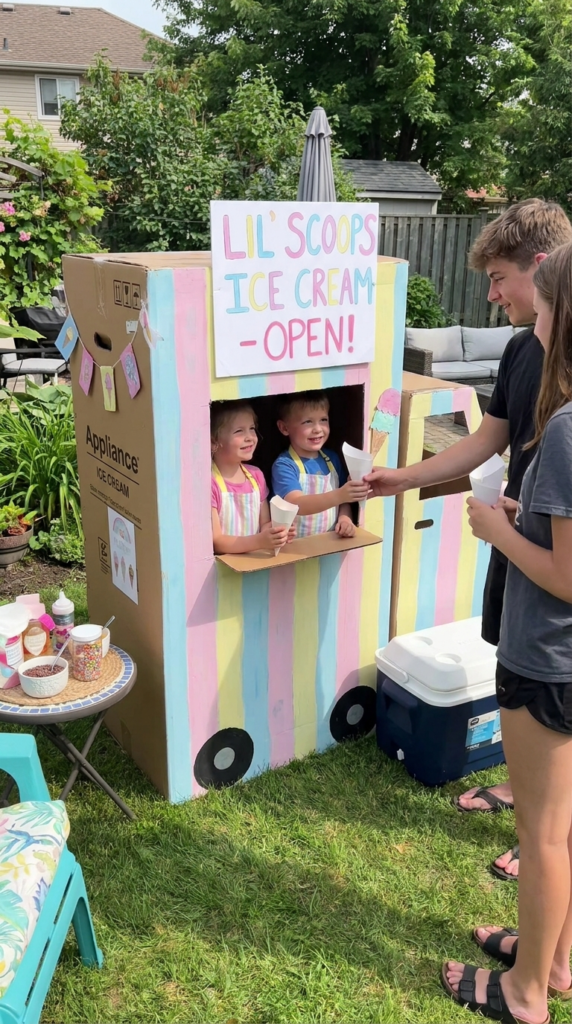
A large cardboard box can become the foundation for an imaginative ice cream truck. Place the box on its side and have an adult carefully cut out a large serving window. Additional cardboard can be used to create a counter, wheels, signs, or decorative details.
Children can paint the outside in cheerful colors and add stripes, dots, paper cones, and pretend menu boards. If you want a simpler project, leave the cardboard exposed and decorate it with construction paper instead of paint.
Once the structure is complete, children can use paper or felt ice cream pieces as pretend products. One child can play the shopkeeper while another acts as the customer. This turns a craft project into an extended role-playing activity that encourages storytelling and cooperative play.
7. Make a Colorful Ice Cream Cone Garland
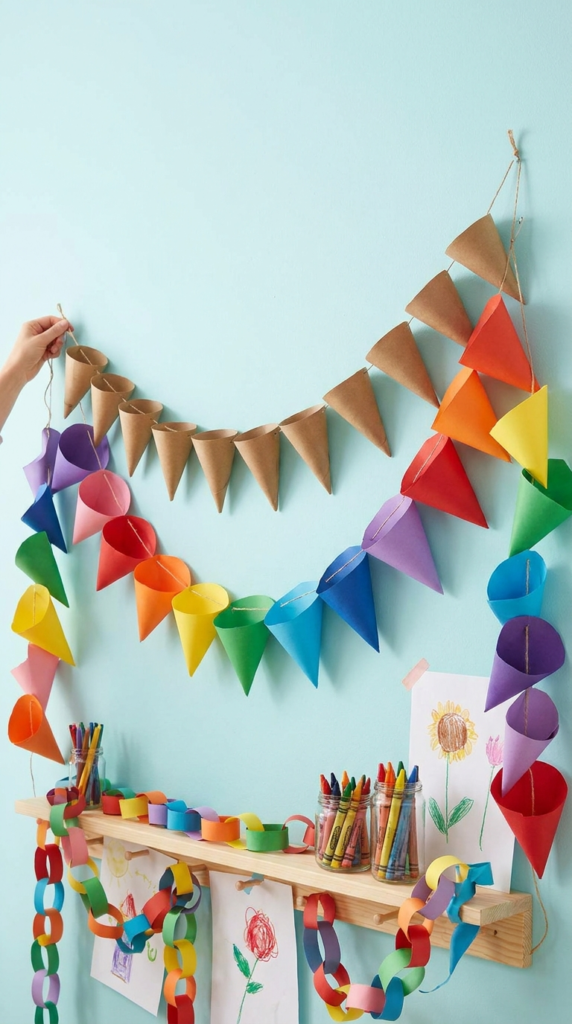
An ice cream cone garland works well for birthday parties, classrooms, playrooms, or summer-themed decorations. Start by cutting cone shapes from brown construction paper or lightweight cardstock.
For the scoops, cut circles, semicircles, or cloud-like shapes from colorful paper. Layer the scoop over the top of each cone and decorate it with drawn sprinkles, small paper shapes, or colorful dots.
Once the individual ice creams are finished, attach them to a length of string or ribbon with tape or small clips. Space the cones evenly so the garland hangs neatly.
You can create a single-flavor theme or make every scoop a different color. This is also an easy craft to adapt for different celebrations by changing the color palette.
8. Paint Ice Cream Scoops on Paper Plates
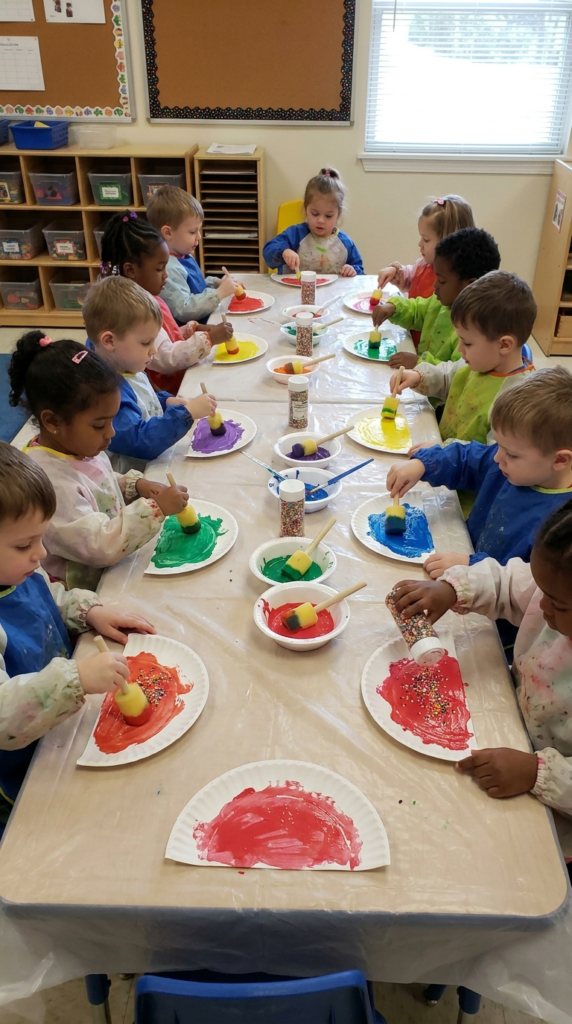
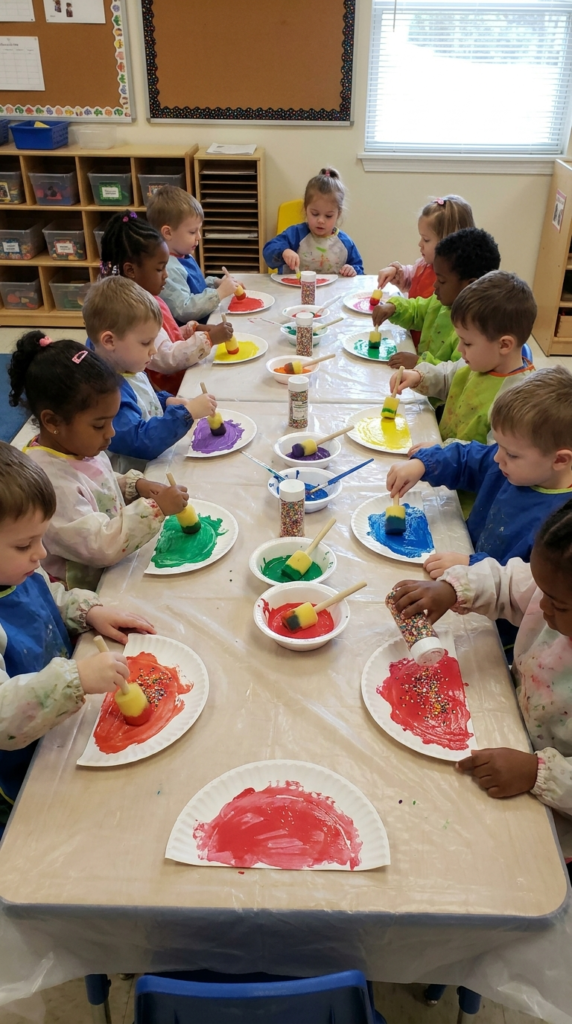
Paper plates provide a large, inexpensive surface for an ice cream-themed art project. Cut each plate in half or use the full plate as a large scoop, depending on the design you want to create.
Give children washable paint and sponge brushes so they can experiment with different textures. Pink, yellow, brown, green, and white paint can represent different flavors, while markers or paper pieces can be added after the paint dries.
For a classroom activity, prepare the plates and materials before the children begin. Instead of using real food as decoration, create sprinkles from strips of colored paper or small pieces of craft foam.
The finished pieces can be combined into a large classroom ice cream shop display or mounted individually as colorful artwork.
9. Create Raised Ice Cream Art With Homemade Puff Paint
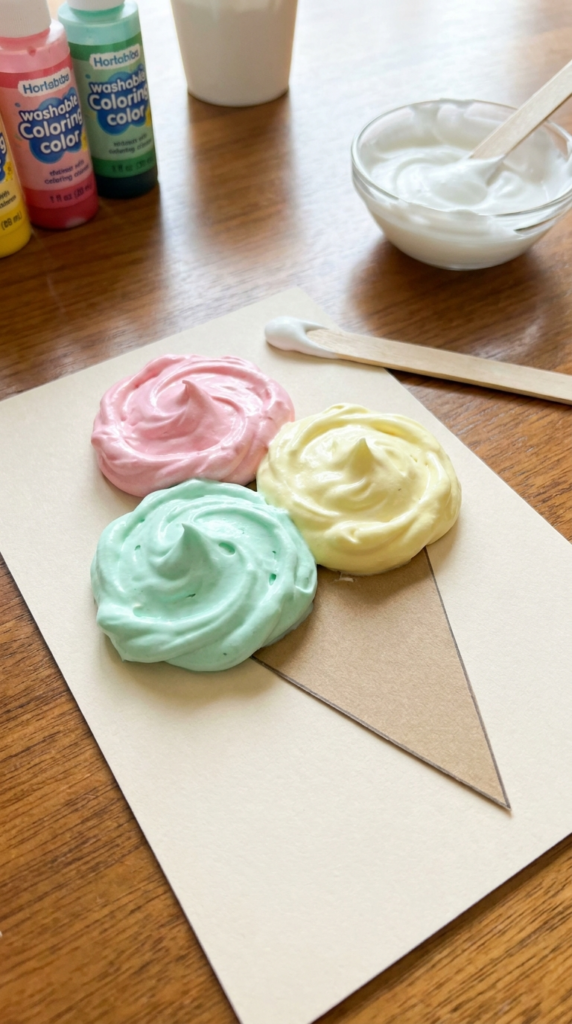
Puff-style paint can give paper ice cream crafts a raised, textured appearance. One simple craft mixture uses white glue and shaving foam, although adults should prepare and supervise the materials, especially when working with younger children.
Tint the mixture with small amounts of washable or craft-safe coloring to create different ice cream shades. Children can then use a craft stick or disposable brush to spread the mixture inside paper scoop outlines.
Allow the artwork to dry completely on a flat surface. The finished scoops should have a soft, dimensional appearance compared with ordinary flat paint.
For younger children, avoid adding ingredients intended to make the craft smell or taste like food. Craft materials should remain clearly separate from anything intended for eating.
10. Wrap Cardboard Ice Cream Shapes With Yarn
Yarn wrapping is another simple way to add texture to an ice cream craft. Cut cone and scoop shapes from sturdy cardboard, then choose yarn colors that correspond with different flavors.
Secure one end of the yarn to the back of the cardboard and wrap it around the shape repeatedly. Encourage children to keep the strands relatively close together so the cardboard underneath becomes less visible.
Brown yarn can create a chocolate-inspired scoop, while white, pink, yellow, or green yarn can represent other flavors. Several finished pieces can be mounted onto cardstock to make a colorful display.
The repetitive wrapping motion can also give children an opportunity to practice controlled hand movements. Younger children may need help keeping the yarn from becoming tangled.
11. Crochet Mini Ice Cream Keychains
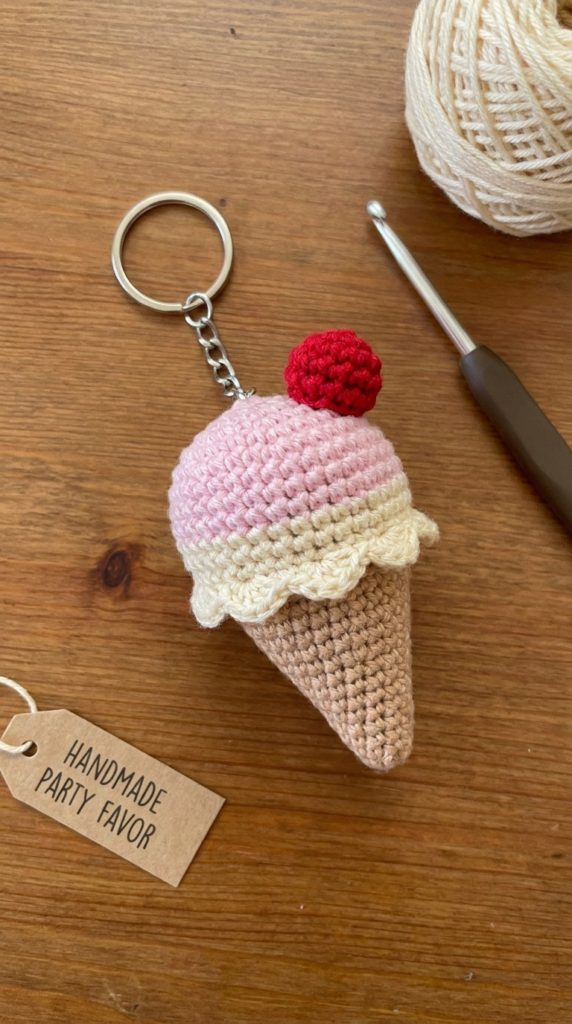
Crochet enthusiasts can turn the familiar ice cream cone shape into a small handmade accessory. Using basic amigurumi techniques, crochet a small cone and a rounded scoop, then add a tiny decorative cherry or sprinkle details.
Once the crochet piece is complete, attach a suitable keychain finding or clasp securely to the top. These mini creations can be used as backpack decorations, handmade gifts, or party favors.
Because small hardware pieces can present a choking hazard, this project is better suited to older children, teens, and adults. If younger children are involved, let them choose yarn colors or help with non-hazardous decorative steps while an adult handles the hardware.
You can also experiment with different combinations, such as a chocolate cone with mint-green ice cream or a pink strawberry scoop with a white topping.
12. Sculpt Soft-Serve Cones With Foam Clay
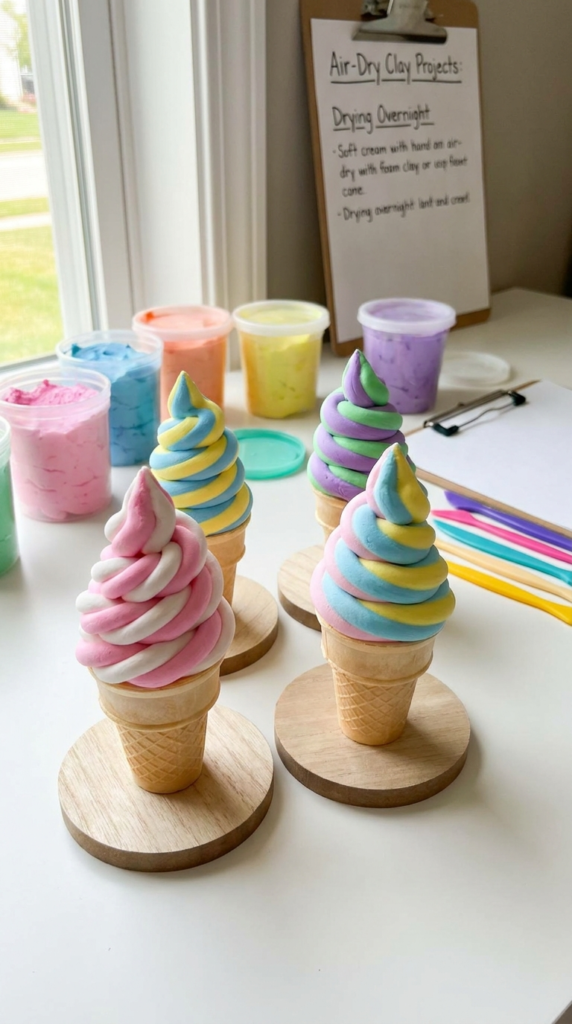
Foam clay is a lightweight material that can be shaped into miniature desserts without the need for a traditional kiln. Begin by forming a cone from tan or brown clay.
For a soft-serve effect, roll a second color into a long rope and carefully coil it upward to resemble a swirl of ice cream. Add tiny clay pieces as sprinkles or create a small ball for a cherry.
Place completed pieces somewhere safe where they can dry according to the clay manufacturer’s instructions. Avoid handling the pieces excessively while they are setting.
This project is particularly fun for children who enjoy sculpting because they can experiment with different shapes rather than following a single template.
13. Make Mini Ice Cream Earrings With Polymer Clay
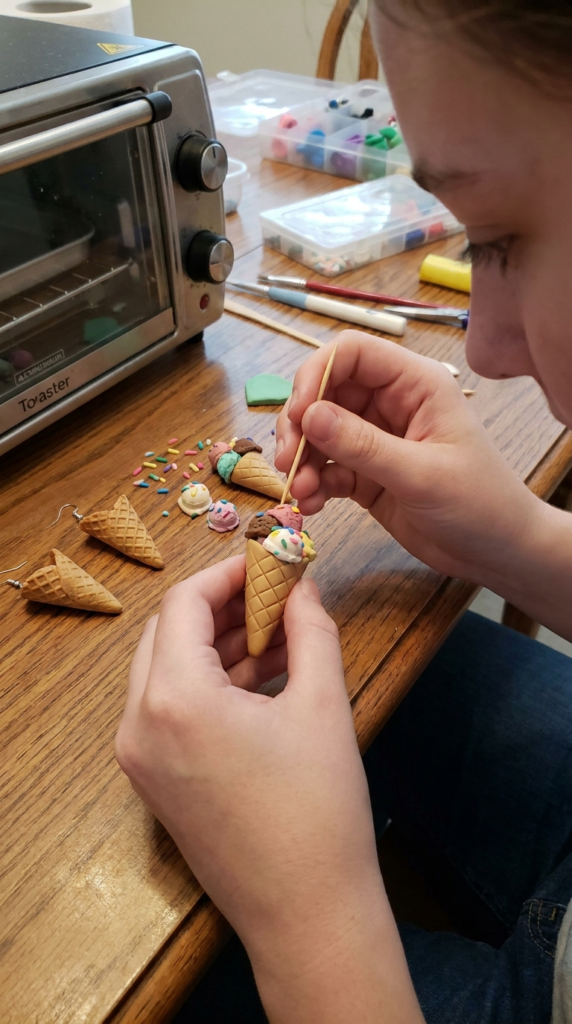
Polymer clay allows older crafters to create detailed miniature ice cream designs that can be turned into jewelry. Begin by shaping a small cone from tan clay and adding a textured pattern to resemble a waffle cone.
Create tiny scoops in colors such as pink, cream, brown, or pale green. Stack them carefully and add miniature clay sprinkles or a small cherry if desired.
Follow the manufacturer’s instructions for conditioning and baking the clay. An adult should handle the oven and any hot materials. Once the pieces have completely cooled, suitable jewelry findings can be attached.
These miniature designs can be adapted into earrings, charms, pendants, or decorative pins. Because of the small components and baking step, this activity is best for teens and adults or with close adult supervision.
14. Make a Colorful Cotton Ball Sundae Collage
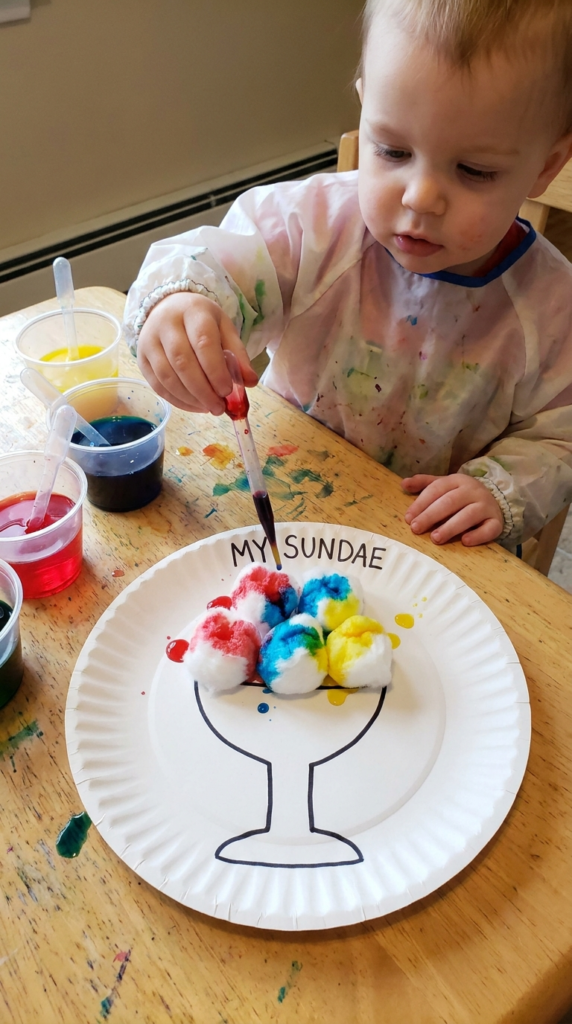
Cotton balls can create a soft, rounded texture for a paper sundae collage. Begin by drawing or printing a large sundae dish on cardstock. Children can then glue cotton balls into the dish to form several pretend scoops.
Leave some areas white or add washable color to the cotton using a controlled painting technique. Liquid watercolor or diluted washable paint can create a syrup-like appearance as it spreads through the cotton.
Let the collage dry completely before displaying it. Paper cutouts can be used for cherries, sprinkles, wafers, and other toppings.
This craft gives younger children opportunities to practice gluing, arranging materials, and observing how colors move across absorbent surfaces. An adult should supervise the use of glue and liquid paints.
15. Fold Ice Cream Cone Corner Bookmarks
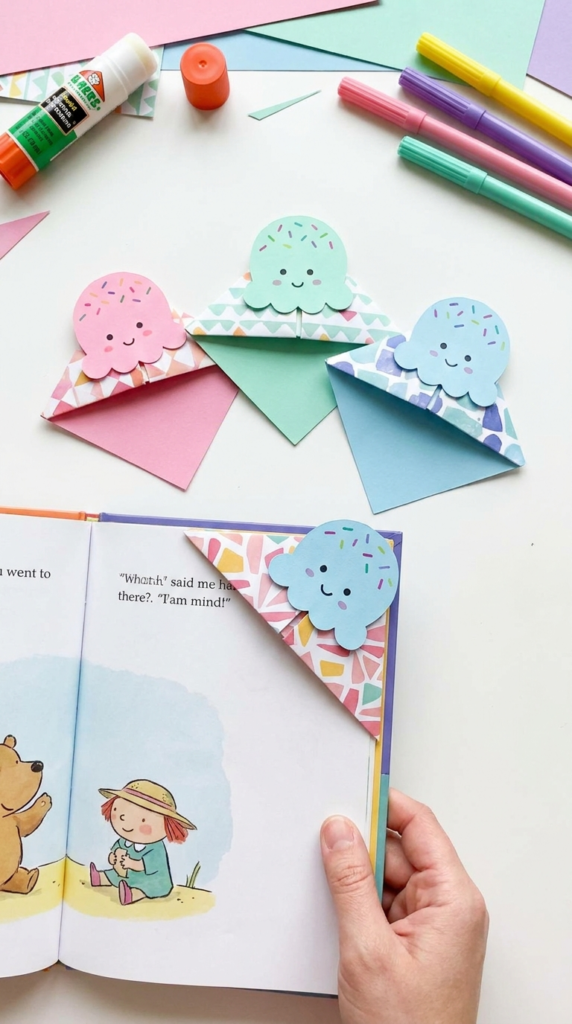
Turn an ordinary piece of square paper into a useful ice cream-themed corner bookmark. Fold the paper into a triangular pocket that can slide over the corner of a book page without requiring a separate clip.
Decorate the front with a paper ice cream scoop and add small details such as sprinkles, chocolate chips, or a cheerful face. Use markers or colored pencils for the finishing touches.
You can make several bookmarks in different flavors and give each one a different personality. Older children can also write the name of the flavor or create themed characters for their bookmarks.
Because the finished craft is functional, it can become part of a reading activity rather than simply being displayed. It is also an inexpensive project for classrooms, libraries, or summer programs.
16. Turn a Mason Jar Into an Ice Cream Savings Bank
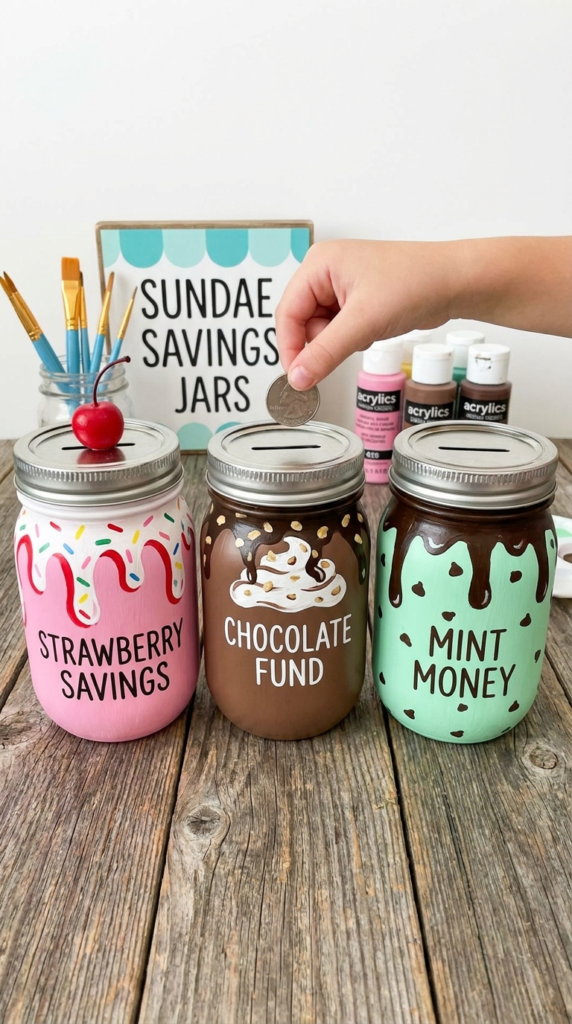
A clean glass jar can be transformed into a playful ice cream-themed savings container. Start by washing and completely drying the jar before decorating it.
Paint the outside to resemble a sundae, using one color for the glass and additional colors for the pretend scoops and toppings. You can create dripping syrup effects with painted lines and add decorative dots as sprinkles.
For the money slot, an adult should modify the lid using an appropriate tool or use a lid that already has a suitable opening. Children can then decorate the finished lid with paper or craft materials.
Once everything is completely dry and secure, the jar can be used to collect coins or small amounts of allowance money. This gives the craft a practical purpose while introducing children to the simple idea of saving.
For younger children, use a plastic container instead of glass to reduce the risk of breakage. The same ice cream design can be recreated on a plastic jar or other suitable container.